How to add Statement Renderers for Custom Expectations
This guide will help you implement Statement RenderersA method for converting Expectations, Validation Results, etc. into Data Docs or other output such as email notifications or slack messages. for your Custom ExpectationsAn extension of the `Expectation` class, developed outside of the Great Expectations library..
Prerequisites: This how-to guide assumes you have:
We will add Statement Renderers to the Custom Expectations built in the guides for creating Custom Column Aggregate Expectations and creating Custom Column Map Expectations.
Great Expectations supports a number of Renderers, allowing you to control how your Custom Expectations are displayed in your Data DocsHuman readable documentation generated from Great Expectations metadata detailing Expectations, Validation Results, etc..
Implementing Renderers as part of your Custom Expectations is not strictly required - if not provided, Great Expectations will render your Custom Expectation using a basic default renderer:

If you decide to contribute your ExpectationA verifiable assertion about data., its entry in the Expectations Gallery will reflect the Renderers that it supports.
Steps
1. Decide which renderer type to implement
There are two basic types of Statement Renderers:
renderer.prescriptiverenders a human-readable form of your Custom Expectationrenderer.diagnosticrenders diagnostic information about the results of your Custom Expectation
Prescriptive Renderers help provide clarity and structure in your Data Docs.
Diagnostic Renderers allow you to serve summary statistics, unexpected value samples, and observed values from your Custom Expectation, delivering further insights about your data.
But what do they look like?
- Prescriptive
- Diagnostic
2. Declare the method for your Prescriptive Renderer
In general, Prescriptive Renderers receive an ExpectationConfiguration as input and return a list of rendered elements.
There are several ways to implement a Prescriptive Renderer. We're going to implement a String Template Renderer and a Table Renderer.
Both of these implementations will share the @renderer(renderer_type="renderer.prescriptive) decorator, the @render_evaluation_parameter_string decorator, and the same initial method declaration. In our case, this looks like the following:
@renderer(renderer_type="render.prescriptive")
    @render_evaluation_parameter_string
    def _prescriptive_renderer(
        cls,
        configuration: ExpectationConfiguration = None,
        result: ExpectationValidationResult = None,
        language: str = None,
        runtime_configuration: dict = None,
        **kwargs,
    ):
        assert (
            configuration or result
        ), "Must provide renderers either a configuration or result."

        runtime_configuration = runtime_configuration or {}
        include_column_name = runtime_configuration.get("include_column_name", True)
        include_column_name = (
            include_column_name if include_column_name is not None else True
        )
        styling = runtime_configuration.get("styling")
        # get params dict with all expected kwargs
        params = substitute_none_for_missing(
            configuration.kwargs,
            [
                "column",
                "min_value",
                "max_value",
                "mostly",
                "row_condition",
                "condition_parser",
                "strict_min",
                "strict_max",
            ],
        )
While not strictly necessary for all Custom Expectations,
adding the @render_evaluation_parameter_string decorator allows Expectations that use Evaluation Parameters
to render the values of the Evaluation ParametersA dynamic value used during Validation of an Expectation which is populated by evaluating simple expressions or by referencing previously generated metrics. along with the rest of the output.
- String Template
- Table
3. Implement the logic for your String Template Renderer
The String Template Prescriptive Renderer will render a semantic declaration of your Custom Expectation populated with the parameters your Custom Expectation requires.
The following example is being implemented in the Custom Expectation built in our guide on how to create Custom Column Aggregate Expectations.
To make this happen, we're going to build a template string based off of which parameters have been provided:
# build the string, parameter by parameter
        if (params["min_value"] is None) and (params["max_value"] is None):
            template_str = "maximum value may have any numerical value."
        else:
            at_least_str, at_most_str = handle_strict_min_max(params)

            if params["min_value"] is not None and params["max_value"] is not None:
                template_str = f"maximum value must be {at_least_str} $min_value and {at_most_str} $max_value."
            elif params["min_value"] is None:
                template_str = f"maximum value must be {at_most_str} $max_value."
            elif params["max_value"] is None:
                template_str = f"maximum value must be {at_least_str} $min_value."
            else:
                template_str = ""

        if include_column_name:
            template_str = "$column " + template_str

        if params["row_condition"] is not None:
            (
                conditional_template_str,
                conditional_params,
            ) = parse_row_condition_string_pandas_engine(params["row_condition"])
            template_str = conditional_template_str + ", then " + template_str
            params.update(conditional_params)
Then we return our string template, including the parameters that will populate and render it:
return [
            RenderedStringTemplateContent(
                **{
                    "content_block_type": "string_template",
                    "string_template": {
                        "template": template_str,
                        "params": params,
                        "styling": styling,
                    },
                }
            )
        ]
4. Verifying your implementation
If the core logic for your Custom Expectation is already complete, you can now utilize your Custom Expectation in an Expectation SuiteA collection of verifiable assertions about data. and ValidateThe act of applying an Expectation Suite to a Batch. against your data with a CheckpointThe primary means for validating data in a production deployment of Great Expectations., and see something similar to the following in your Data Docs:

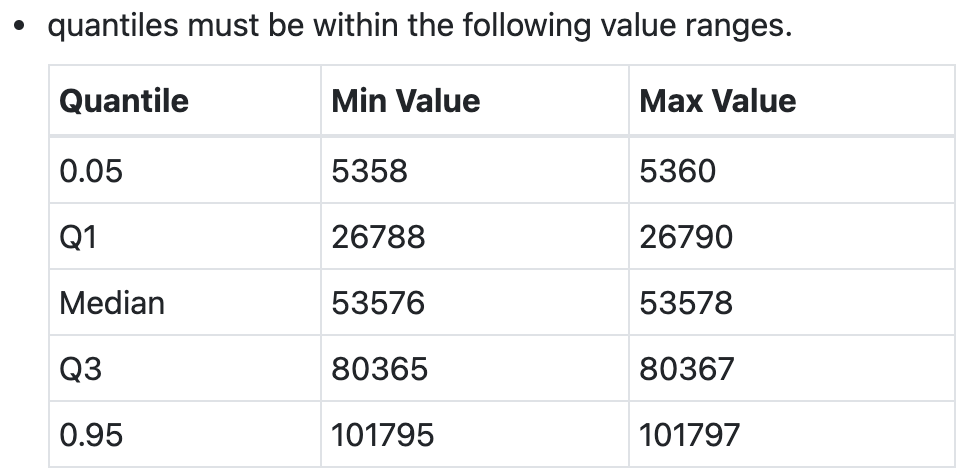
3. Implement the logic for your Table Renderer
The Table Renderer will render a semantic declaration of your Custom Expectation, including a table of values populated with the parameters your Custom Expectation requires.
The following example can be found in ExpectColumnQuantileValuesToBeBetween.
To make this happen, we first build our template string from our parameters:
},
                    {
                        "value": value_range[0]
                        if value_range[0] is not None
                        else "Any",
                        "schema": {
                            "type": "number" if value_range[0] is not None else "string"
                        },
                    },
                    {
                        "value": value_range[1]
                        if value_range[1] is not None
                        else "Any",
                        "schema": {
                            "type": "number" if value_range[1] is not None else "string"
                        },
                    },
                ]
            )

        return (
            header_template_str,
Then we build the table from our parameters:
styling,
            table_header_row,
            table_rows,
        )

    @classmethod
    @renderer(renderer_type="atomic.prescriptive.summary")
    @render_evaluation_parameter_string
    def _prescriptive_summary(
        cls,
        configuration=None,
        result=None,
        language=None,
        runtime_configuration=None,
        **kwargs,
    ):
        """
        Rendering function that is utilized by GE Cloud Front-end
        """
        (
            header_template_str,
            header_params_with_json_schema,
            _,
            table_header_row,
            table_rows,
        ) = cls._atomic_prescriptive_template(
            configuration, result, language, runtime_configuration, **kwargs
        )
        value_obj = renderedAtomicValueSchema.load(
            {
                "header": {
                    "schema": {"type": "StringValueType"},
                    "value": {
                        "template": header_template_str,
                        "params": header_params_with_json_schema,
                    },
                },
Finally, we return both our template string and our table:
"table": table_rows,
4. Verifying your implementation
If the core logic for your Custom Expectation is already complete, you can now utilize your Custom Expectation in an Expectation SuiteA collection of verifiable assertions about data. and ValidateThe act of applying an Expectation Suite to a Batch. against your data with a CheckpointThe primary means for validating data in a production deployment of Great Expectations., and see something similar to the following in your Data Docs:
If you have already implemented one of the Diagnostic Renderers covered elsewhere in this guide, you should now see the following when you call the print_diagnostic_checklist() method on your Custom Expectation:
✔ Has both Statement Renderers: prescriptive and diagnostic
Congratulations!
🎉 You've successfully implemented a Prescriptive Renderer for a Custom Expectation! 🎉
2. Declare the method for your Diagnostic Renderer
In general, Diagnostic Renderers receive an ExpectationValidationResult as input and return a list of rendered elements.
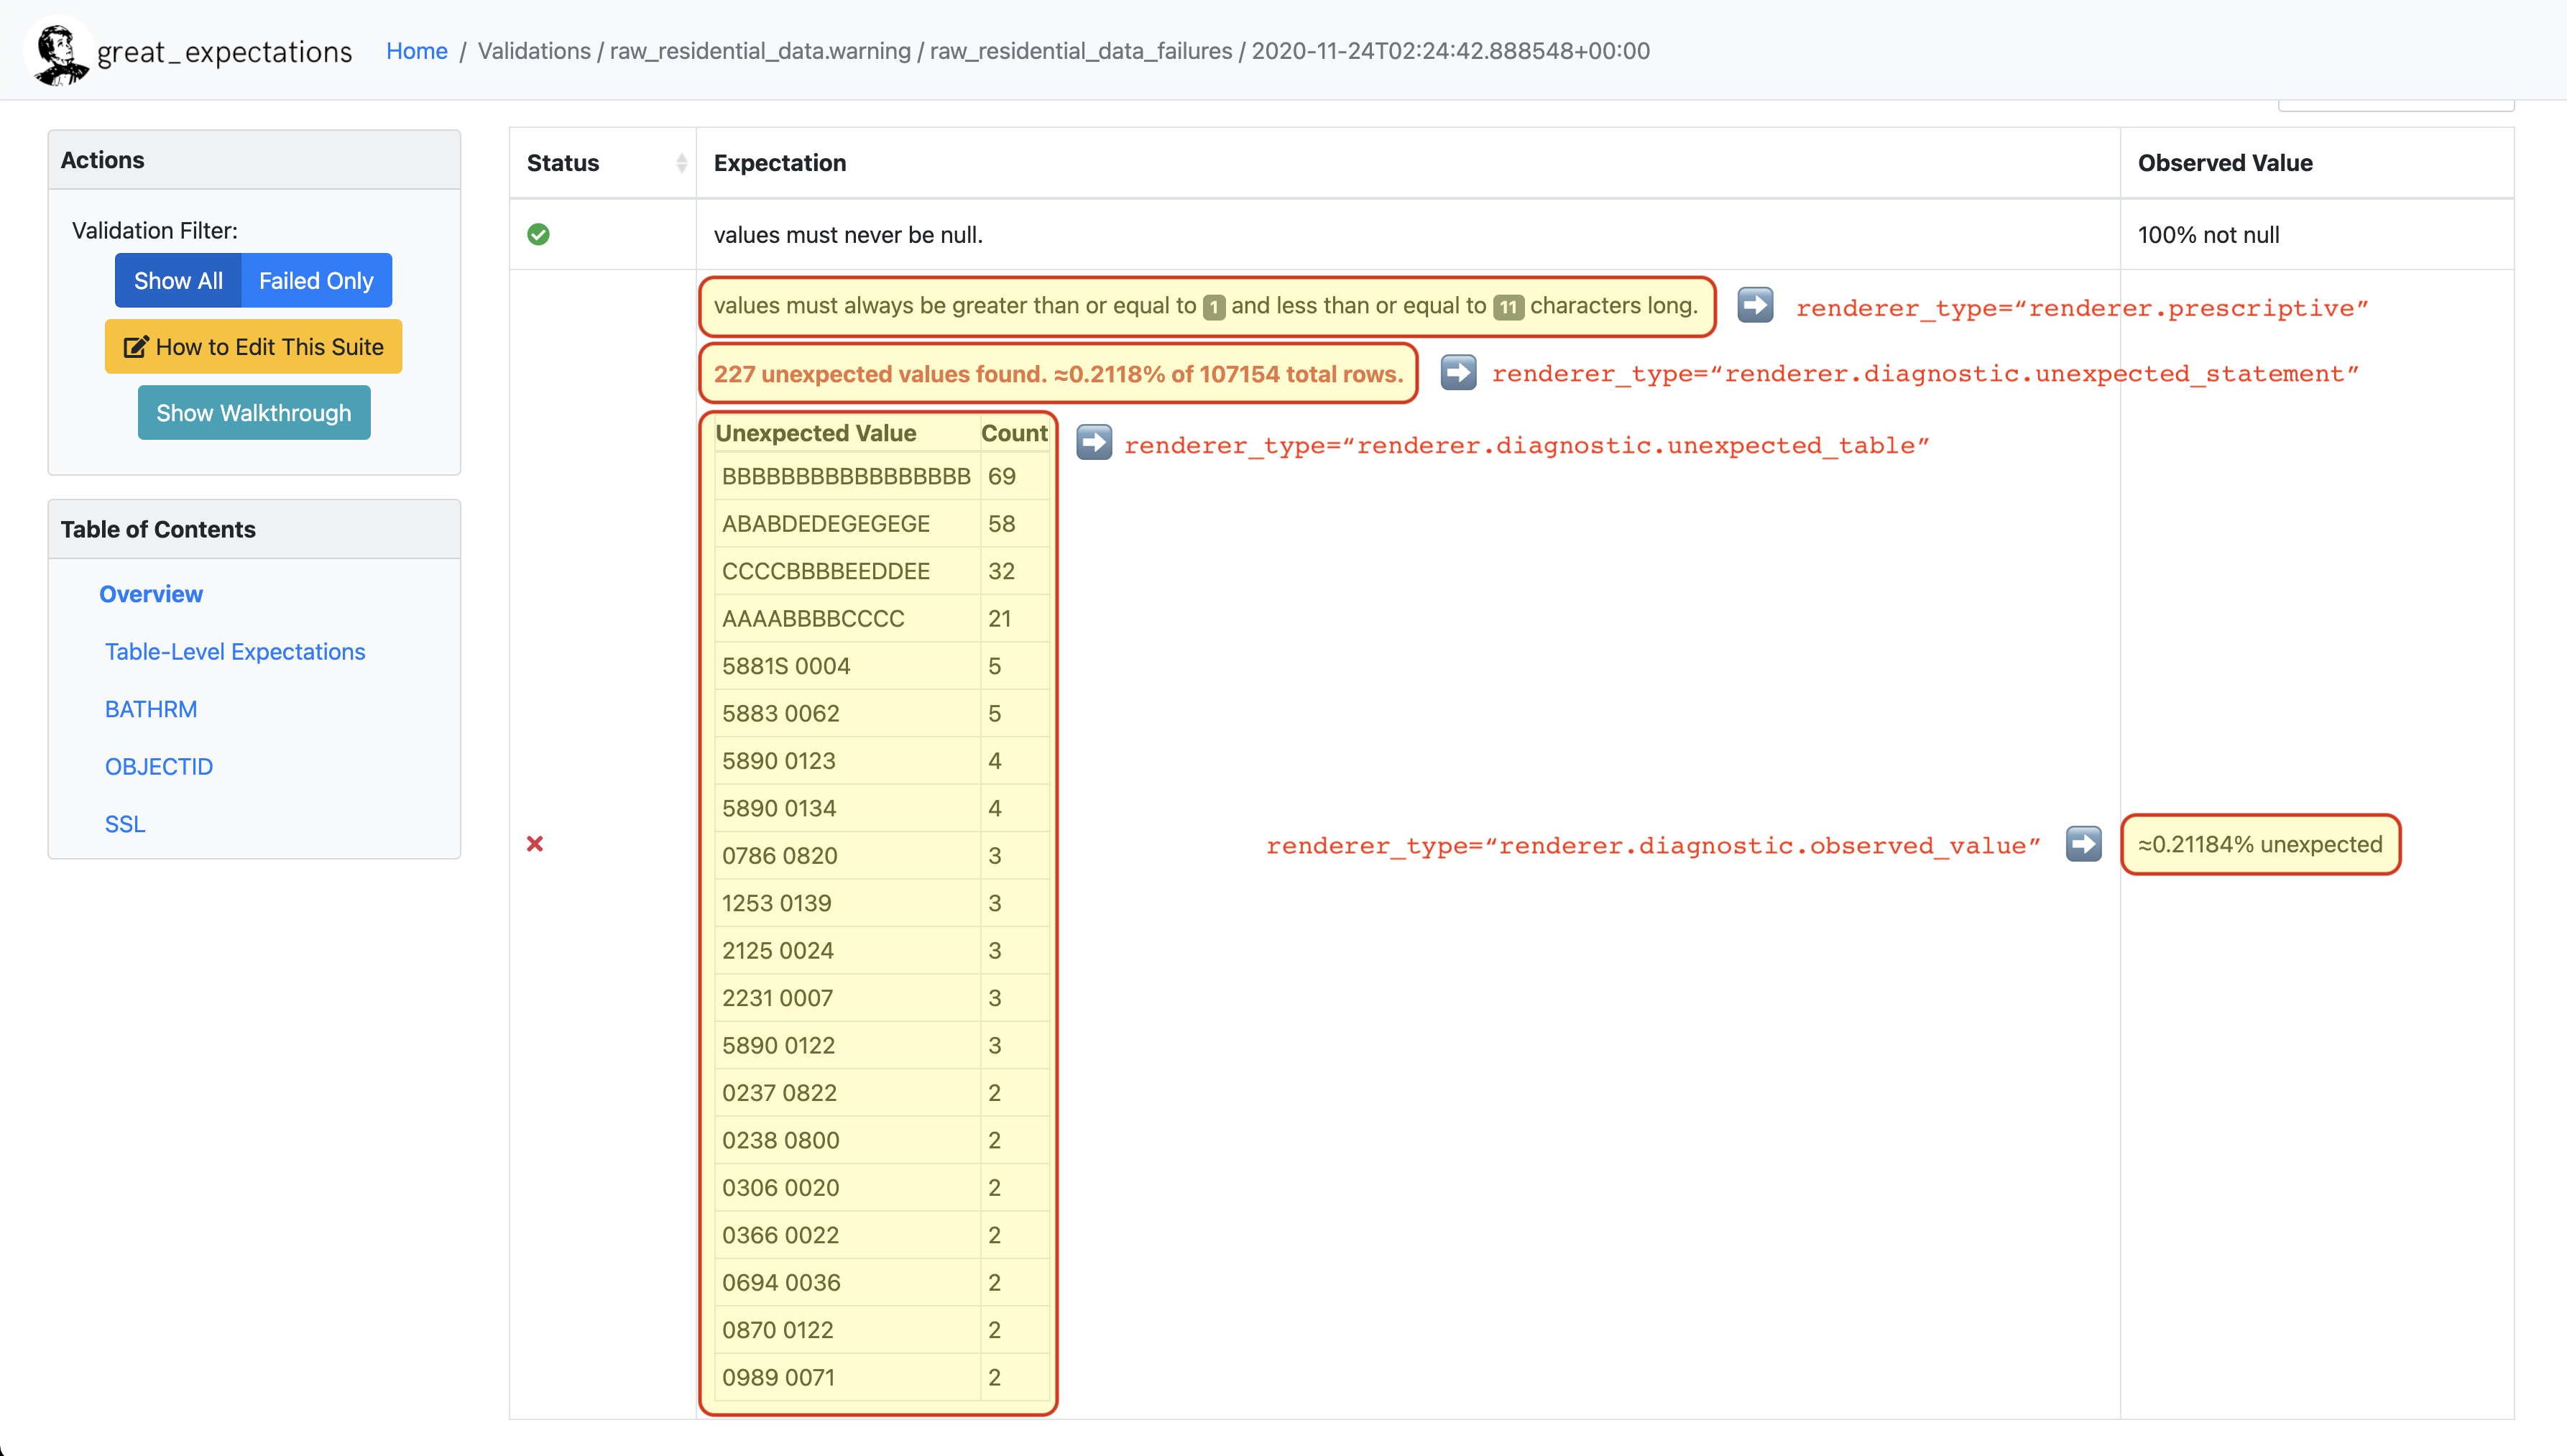
There are several ways to implement a Diagnostic Renderer. We're going to implement an Unexpected Statement Renderer, an Unexpected Table Renderer, and an Observed Value Renderer.
All three of these implementations will utilize the @render_evaluation_parameter_string decorator, and the same initial method declaration.
Each will have a slightly different @renderer decorators and method names reflecting the type of Diagnostic Renderer being implemented, but will have similar initial declarations.
Here is an example for the Observed Value Renderer:
return "--"

        if result_dict.get("observed_value"):
            observed_value = result_dict.get("observed_value")
            if isinstance(observed_value, (int, float)) and not isinstance(
                observed_value, bool
            ):
                return num_to_str(observed_value, precision=10, use_locale=True)
            return str(observed_value)
        elif result_dict.get("unexpected_percent") is not None:
            return (
While not strictly necessary for all Custom Expectations,
adding the @render_evaluation_parameter_string decorator allows Expectations that use Evaluation Parameters
to render the values of the Evaluation Parameters along with the rest of the output.
- Observed Value
- Unexpected Statement
- Unexpected Table
3. Implement the logic for your Observed Value Renderer
The Observed Value Diagnostic Renderer will render the observed_value or unexpected_percent returned by your Custom Expectation, if one is returned.
The following example is being implemented in the Custom Expectation built in our guide on how to create Custom Column Map Expectations.
To make this happen, we're going to access the results of our Custom Expectation:
+ "% unexpected"
            )
        else:
And return the observed value or unexpected percent in our results, transforming those values to strings if necessary:
@renderer(renderer_type="renderer.diagnostic.unexpected_statement")
    @render_evaluation_parameter_string
    def _diagnostic_unexpected_statement_renderer(
        cls,
        configuration: ExpectationConfiguration = None,
        result: ExpectationValidationResult = None,
        language: str = None,
        runtime_configuration: dict = None,
        **kwargs,
    ):
        assert result, "Must provide a result object."

        success = result.success
4. Verifying your implementation
If the core logic for your Custom Expectation is already complete, you can now utilize your Custom Expectation in an Expectation SuiteA collection of verifiable assertions about data. and ValidateThe act of applying an Expectation Suite to a Batch. against your data with a CheckpointThe primary means for validating data in a production deployment of Great Expectations.. When you build your Data Docs you should see an observed value or unexpected percent populating the Observed Value column of your Validation ResultsGenerated when data is Validated against an Expectation or Expectation Suite..
3. Implement the logic for your Unexpected Statement Renderer
The Unexpected Statement Diagnostic Renderer will render summary statistics returned by your Custom Expectation, if unexpected_count and element_count are returned.
The following example is being implemented in the Custom Expectation built in our guide on how to create Custom Column Map Expectations.
To make this happen, we're going to access the results of our Custom Expectation:
"expectation_type": result.expectation_config.expectation_type,
                            "exception_message": result.exception_info[
If our Custom Expectation raised an exception, we're going to build an exception template string:
],
                        },
                        "tag": "strong",
                        "styling": {
And return the rendered exception and traceback:
"params": {
                                "exception_message": {"tag": "code"},
                                "expectation_type": {
                                    "classes": ["badge", "badge-danger", "mb-2"]
                                },
                            },
                        },
                    },
                }
            )

            exception_traceback_collapse = CollapseContent(
                **{
                    "collapse_toggle_link": "Show exception traceback...",
                    "collapse": [
                        RenderedStringTemplateContent(
                            **{
                                "content_block_type": "string_template",
                                "string_template": {
                                    "template": result.exception_info[
                                        "exception_traceback"
                                    ],
                                    "tag": "code",
                                },
                            }
                        )
                    ],
                }
            )

            return [exception_message, exception_traceback_collapse]

        if success or not result_dict.get("unexpected_count"):
            return []
        else:
            unexpected_count = num_to_str(
                result_dict["unexpected_count"], use_locale=True, precision=20
            )
            unexpected_percent = (
                num_to_str(result_dict["unexpected_percent"], precision=4) + "%"
            )
            element_count = num_to_str(
                result_dict["element_count"], use_locale=True, precision=20
            )
If our Custom Expectation succeeds, or encounters no unexpected values, we return an empty list:
"\n\n$unexpected_count unexpected values found. "
                "$unexpected_percent of $element_count total rows."
Otherwise, we build a template string summarizing our unexpected results, and return the rendered string:
)

            return [
                RenderedStringTemplateContent(
                    **{
                        "content_block_type": "string_template",
                        "string_template": {
                            "template": template_str,
                            "params": {
                                "unexpected_count": unexpected_count,
                                "unexpected_percent": unexpected_percent,
                                "element_count": element_count,
                            },
                            "tag": "strong",
                            "styling": {"classes": ["text-danger"]},
                        },
                    }
                )
            ]

    @renderer(renderer_type="renderer.diagnostic.unexpected_table")
    @render_evaluation_parameter_string
    def _diagnostic_unexpected_table_renderer(
        cls,
        configuration: ExpectationConfiguration = None,
        result: ExpectationValidationResult = None,
        language: str = None,
        runtime_configuration: dict = None,
        **kwargs,
    ):
        try:
            result_dict = result.result
        except KeyError:
4. Verifying your implementation
If the core logic for your Custom Expectation is already complete, you can now utilize your Custom Expectation in an Expectation SuiteA collection of verifiable assertions about data. and ValidateThe act of applying an Expectation Suite to a Batch. against your data with a CheckpointThe primary means for validating data in a production deployment of Great Expectations.. When you build your Data Docs, if your Custom Expectation encountered unexpected values, you should see a statement in the Expectation column of your Validation ResultsGenerated when data is Validated against an Expectation or Expectation Suite. detailing summary statistics about those unexpected values.
3. Implement the logic for your Unexpected Table Renderer
The Unexpected Table Diagnostic Renderer will render a sample of unexpected values or value counts returned by your Custom Expectation, if partial_unexpected_list or partial_unexpected_counts are returned.
The following example is being implemented in the Custom Expectation built in our guide on how to create Custom Column Map Expectations.
To make this happen, we're going to access the results of our Custom Expectation, and return None if we don't have the required data:
if result_dict.get("partial_unexpected_counts"):
            total_count = 0
            for unexpected_count_dict in result_dict.get("partial_unexpected_counts"):
                value = unexpected_count_dict.get("value")
                count = unexpected_count_dict.get("count")
                total_count += count
                if value is not None and value != "":
                    table_rows.append([value, count])
                elif value == "":
                    table_rows.append(["EMPTY", count])
                else:
Then, we're going to start building our table:
If we have partial_unexpected_counts, we're going to total the counts for each value, and build rows of value and count.
If we don't have all of the unexpected values available, we reduce our table from value and count down to just the Sampled Unexpected Values:
header_row = ["Unexpected Value", "Count"]
            else:
                header_row = ["Sampled Unexpected Values"]
                table_rows = [[row[0]] for row in table_rows]

        else:
            header_row = ["Sampled Unexpected Values"]
            sampled_values_set = set()
            for unexpected_value in result_dict.get("partial_unexpected_list"):
                if unexpected_value:
                    string_unexpected_value = str(unexpected_value)
                elif unexpected_value == "":
                    string_unexpected_value = "EMPTY"
                else:
                    string_unexpected_value = "null"
                if string_unexpected_value not in sampled_values_set:
                    table_rows.append([unexpected_value])
                    sampled_values_set.add(string_unexpected_value)

        unexpected_table_content_block = RenderedTableContent(
If we don't have partial_unexpected_counts, we build our table of Sampled Unexpected Values:
"content_block_type": "table",
                "table": table_rows,
                "header_row": header_row,
                "styling": {
                    "body": {"classes": ["table-bordered", "table-sm", "mt-3"]}
                },
            }
        )

        return unexpected_table_content_block

    # This dictionary contains metadata for display in the public gallery
    library_metadata = {
And return the rendered table:
"contributors": ["@joegargery"],
    }


if __name__ == "__main__":
    ExpectColumnValuesToEqualThree().print_diagnostic_checklist()

# Note to users: code below this line is only for integration testing -- ignore!

diagnostics = ExpectColumnValuesToEqualThree().run_diagnostics()

for check in diagnostics["tests"]:
4. Verifying your implementation
If the core logic for your Custom Expectation is already complete, you can now utilize your Custom Expectation in an Expectation SuiteA collection of verifiable assertions about data.
and ValidateThe act of applying an Expectation Suite to a Batch. against your data with a CheckpointThe primary means for validating data in a production deployment of Great Expectations.. When you build your Data Docs, if your Custom Expectation encountered unexpected values, you should see a table in the Expectation column of your Validation ResultsGenerated when data is Validated against an Expectation or Expectation Suite. with a sampling of those values.
If you have already implemented one of the Prescriptive Renderers covered elsewhere in this guide, you should now see the following when you call the print_diagnostic_checklist() method on your Custom Expectation:
✔ Has both Statement Renderers: prescriptive and diagnostic
Congratulations!
🎉 You've successfully implemented a Diagnostic Renderer for a Custom Expectation! 🎉
5. Contribution (Optional)
Renderers are not a requirement for for contribution back to Great Expectations at an Experimental level.
Implementing at least one Prescriptive and Diagnostic Renderer from this guide is required for contribution back to Great Expectations at a Beta or Production level.
If you believe your Custom Expectation is ready for contribution, please submit a Pull Request, and we will work with you to ensure your Custom Expectation meets these standards.
For more information on our code standards and contribution, see our guide on Levels of Maturity for Expectations.
To view the full scripts used in this page, see them on GitHub: